Description: Learn how to modify business information, settings, and Reasons associated with various actions throughout Shift4 Dine.
To watch more how-to videos, visit our video section.
Regional Availability: Unless otherwise noted, the settings in this article apply to all supported regions. Country-specific features and differences are identified within the applicable sections.
To edit Business Settings, navigate to Manager > Settings > Business.
Jump to a section by selecting a link below:
General Tab in Business Settings
On the General tab, enter basic information on how the Workstation works in conjunction with your business.
- Start of Business Day: This time designates the reset for End of Day, Till Management, and Ticket Management. Reports also generate information based on the value set here. This is typically set to your batch time.
- Auto Logout After: Determines how long a terminal can remain idle before the user is automatically logged out. You can choose a duration of 1 to 15 minutes for auto-logout.
-
Default Starting Cash In: The starting amount of cash used in drawer calculations.
- Cash Drawer: Sets the starting cash for all users of a physical cash drawer.
- Employee Bank: Sets the starting cash for all users using a floating cash drawer.
- Starting Cash is Left in Drawer: When selected, it excludes starting cash from the cash expected during drawer counts. For example, if the starting cash is $200 and there is $100 in sales and tips in the drawer, the cash expected is $100.
- Require Reason for Cash In & Out: Requires a reason to be entered any time a cash-in or cash-out operation is performed on a drawer.
- Enable Digital Receipts (Available in United States Only): Allows customers to receive receipts via text message or email instead of a printed copy.
- Email Address: The business email address to print on receipts.
- Message of the Day: Text that displays on the Login screen above the keypad on all terminals. Use this to communicate a reminder or announcement to employees before they log in for the day.
- Show Drawer Equations for Cash In & Out: Shows the equations when the cash-in/out drawer functions are used.
- Allow Custom Starting Cash: Allows you to edit your starting cash amount when Start of Day is performed. The amount set in Default Starting Cash In is used as the default amount in the drawer.
- Automatically Close Change Due Dialog: Sets a time, in seconds, before the Change Due dialog disappears. If deactivated, the user must select Done to close the message.
Advanced Tab in Business Settings
The Advanced tab allows you to configure how tips and discounts work, and how credit card payments are accepted.
- Non-Cash Tips are Paid as Wages: When enabled, allows non-cash tips to be paid as wages.
- Gratuities are Paid as Wages: When enabled, allows gratuities to be paid as wages.
- Allow Tips Globally: When enabled, allows tips to be added to all tickets processed in the system. If disabled, you cannot accept tips on any transaction.
- Enable Tip Reduction: Controls whether you can pass processing fees down to employees, removing the fees from the tip amount rather than the ticket amount.
- Set Tip Reduction Percentage: Determines the percentage of each tip deducted to offset credit card processing fees before tips are distributed to staff.
- Calculate Tip Hints On Items Subtotal: When enabled, suggested tip amounts are calculated using the item subtotal only, excluding discounts, ticket-level surcharges, gratuities, and taxes.
-
Use Open Discounts (Tickets, Items): Determines whether the Open Discount option is available in the Discount pop-up on the Order Entry screen. If selected, entries in Set Predefined Open Discounts are required.
- Define four discounts to appear as suggestion buttons at the bottom of the Open Discount dialog box.
- Enter percentages as whole numbers (for example, a 15% tip suggestion should be set to 15.00).
- Include All Credit Card Payments in the Daily Batch: This setting includes all credit card payments in the daily batch rather than holding some for later tip finalization. For details, visit the Finalize Tips Immediately article.
- Maximum Tip Percentage Limit: Prevents an employee from adjusting a tip on a payment when the tip amount exceeds the set threshold. If a tip exceeds the Maximum Tip Percentage Limit, a manager must approve it via PIN entry or card swipe.
- Allow Pre-Authorization: Allows an amount to be reserved on a customer's credit card before they order anything in the system. This is often used to set up customer or bar tabs. If enabled, set the Standard Pre-Auth Amount to reserve on the card.
-
Offline Processing: Allows transactions to be processed during internet or gateway outages. Offline transactions are stored and pushed through once online processing returns.
Note: Offline Processing only applies to locations that process through Shift4, not TSYS. You can also set an offline processing limit. - Limit Authorization Amount Per Transaction: Prevents a transaction from being processed offline when the transaction amount exceeds the set threshold.
- Auto-Complete When Required Modifiers are Met: When selected, it closes the modifier selection screen once all modifier requirements for the item are met.
To watch more how-to videos, visit our video section.
Customers Tab in Business Settings
The Customers tab allows you to set defaults and required information for customers added to the system.
Fill in the default City, State, and Zip Code when applying to each new customer.
Requiring an Address, Phone Number, or Email Address ensures these fields are filled in when adding a customer.
- Enable House Accounts: Controls whether a customer can have a house account assigned to them. Enabling this also allows you to set a House Account Threshold dollar amount.
Note: A House Account Threshold set here applies to any new customer created. You can also add or adjust amounts directly on each customer.
Labor Tab in Business Settings
The Labor tab lets you adjust labor settings in the system. From here, you can configure pay period settings, break settings, and other labor-related options. Some settings vary by region.
The payroll rules set up here are reflected in employees' shift reports and in all payroll reports for managers.
For more information on labor functionality, visit the Labor and Time Clock Guide.
- Pay Period (Start of Week): Choose from the predetermined drop-down options to set which day of the week your pay period begins.
- Pay Period Type: Select whether the pay period is Weekly, Biweekly, or Monthly.
-
Breaks: Choose from the predetermined drop-down options:
- Always Paid: Time spent on break is not deducted from total hours worked on a shift.
- Never Paid: Time spent on break is deducted from total hours worked on a shift.
-
Optional: Prompts the employee, when going on break, to indicate whether it is a paid or unpaid break.
- Minimum Wage: The minimum wage paid to your employees.
-
Overtime Settings (Available in United States, Ireland, Spain, and the United Kingdom):
- Overtime Rules: Select whether overtime is calculated Weekly (Federal - FLSA) or by California law.
- Daily Overtime Thresholds: Sets the number of hours per day that determine overtime wages.
- Weekly Overtime Thresholds: Sets the number of hours per week that determine overtime wages.
Note: Overtime settings are not available in Canada.
Reasons Tab in Business Settings
Note: Reason configuration is accessible via the Workstation. Shift4 Dine Customer Hub does not currently support reason configuration.
The Reasons tab allows you to set reasons for discounts, voids, cash in, cash out, removing taxes, and refunds performed in the system.
If there is text you routinely need to type as a reason, create a reason and assign it to the actions you want it to prompt for. You can add a description, toggle whether to track it as wasted inventory, and require comments.
Add or Edit a Reason in Business Settings
- To add a new reason, select Add New Reason in the lower-left corner.
- To edit an existing reason, select the reason from the list on the left, make the desired changes, and select Save.
- Use Edit List to rank reasons by hierarchy.
Each reason includes the following fields:
- Active: Toggles whether the selected reason displays.
- Reason Name: The name of the reason, used as a descriptor throughout the system.
- Description: A brief description of what the reason is and when or how it should be used.
- Assigned Actions: Select an action from the left (unassigned) to move it to the right (assigned), or the reverse to unassign it.
- Track Wasted Inventory: Tracks how much inventory is wasted due to different reasons.
- Comment Required: Controls whether a comment must be entered when the reason is used. Comments are extra notes that clarify why the event is occurring.
- Duplicate: Creates a copy of the currently selected reason, useful for quickly creating similar reasons. The copy needs a new name, since no two reasons can share the same name.
Delete or Remove a Reason in Business Settings
Note: Shift4 Dine cannot delete or remove a reason from the menu once it has been added to the Workstation. The only way to remove a reason from active use is to make it inactive.
To deactivate a reason:
- Navigate to Manager > Settings > Business > Reasons.
- Select the reason to deactivate from the menu on the left.
- Slide the Active toggle off at the top-middle of the screen.
- Select Save in the bottom-right corner.
Printing Tab in Business Settings
The Printing tab lets you adjust printing options for payment receipts.
- Print Signature Line for Credit Card Payments: Determines whether customers must sign a receipt when using a credit card. To print a signature line only after a certain total amount is met, set the Credit Card Signature Line Threshold.
Marketplace Tab in Business Settings
The Marketplace tab allows you to edit Marketplace integration settings for online ordering. This sets up the taxes, supplemental fee, and order types to pair with the settings on the Workstation.
You can enable the toggle to save customers to the database.
You can also enable QR Pay, which generates a QR code to print on receipts.
Important: These fields must be filled in before using Online Ordering or any third-party online ordering on the Workstation.
Advantage Tab in Business Settings
Available in United States only.
All Advantage Program settings are managed and configured in the Customer Hub.
Note: The Advantage Program is not available in Canada, Ireland, Spain, or the United Kingdom.
Loyalty Tab in Business Settings
The Loyalty program is managed in the Customer Hub. From the Loyalty tab in Business Settings, you can configure settings for the Loyalty program. Available settings differ by region.
Loyalty Tab Settings in the United States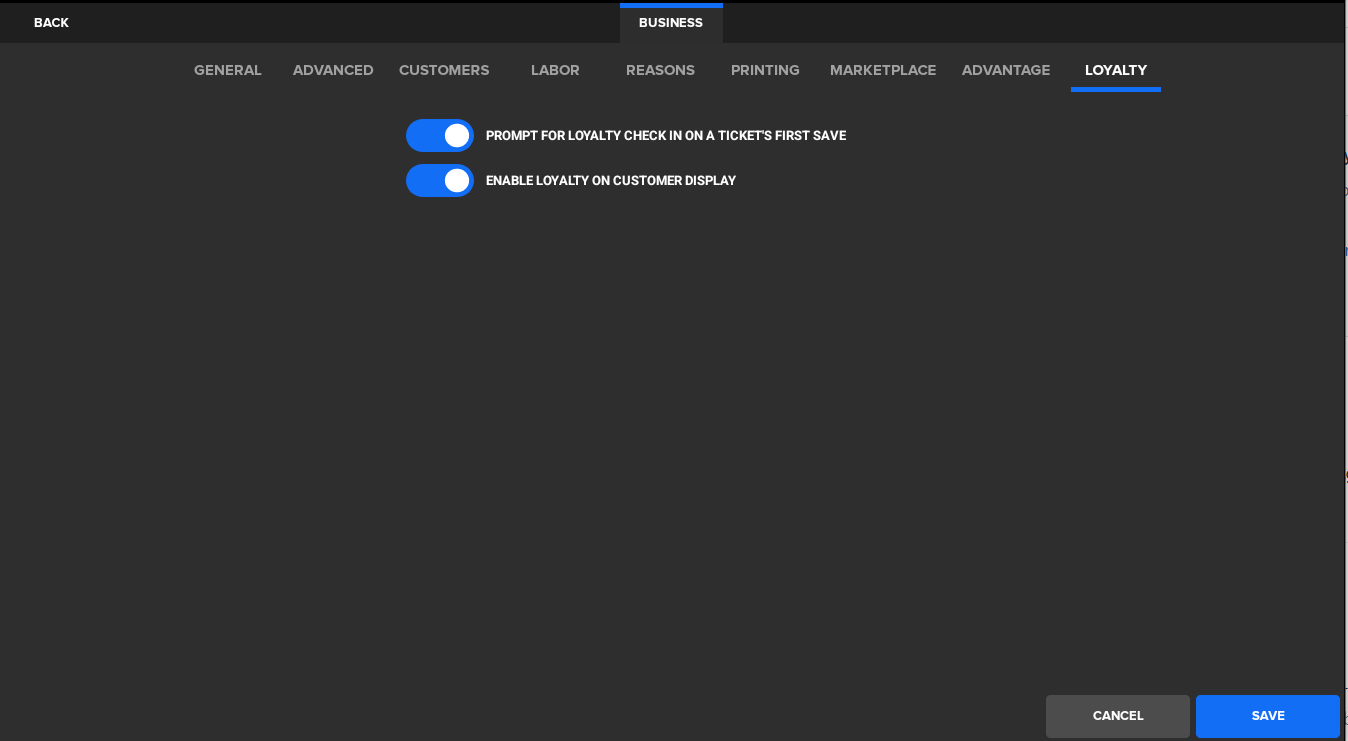
- Prompt for Loyalty Check In on a Ticket's First Save: When enabled, displays a prompt asking staff to check in or associate a loyalty account the first time a ticket is saved.
- Enable Loyalty on Customer Display: Enables the Loyalty prompt on the Customer-facing Display.
Loyalty Tab Settings in Canada, Ireland, Spain, and the United Kingdom

- Prompt for Phone Number on a Ticket's First Save: When an order is sent or payment is taken, prompts the user to enter the customer's loyalty phone number.
-
Enable Loyalty on Customer Display: Enables the Loyalty prompt on the Customer-facing Display.
Important: Select Save after making changes on any tab in Business Settings.