Description: Review the steps to enroll any Android device into our Airwatch environment below.
The following methods will be addressed:
- If the device is already in our Knox environment (This will apply to all Android versions).
- If the device is not in our knox but on Android 10 and above
- If the device is not in our Knox but on Android 9 and below
To begin enrollment, you will always start with factory resetting the device. The path and naming for a factory resetting will vary between device manufacturers. However, the most general way would be...as follows:
- Go to the Device Settings menu.
- Locate the search settings bar normally found at the top of the settings menu or click on the magnifying glass icon that symbolizes "search."
- Type "Factory Reset" or "Erase All Data".
- Click the result that best matches Factory Reset or Factory data reset.
- This should bring up Reset Options.
- Click on whichever option will erase all data and set the phone back to default settings.
- Once the reset is completed, you can enter in wifi information and then go ahead with the process that pertains to your device.
If Your Device is in Knox Already:
After entering your WiFi information, you will see the message "Updating Knox Enrollment Service...~%" like in the screenshot below.
Note: If you are not taking to this screen, then your device is not in our Knox. You will need to Factory Reset the device again and go through one of the other two methods in the next sections.
You will then be presented with the Samsung Knox Privacy Policy information and redirected to install the Hub app.
Click "Accept & Continue" at the bottom.
The process will then start to set up your device and begin the enrollment into Airwatch.
After the initial set up is complete, select Next and you will be asked to enter the information below:
- Server address: ds705.awmdm.com (This will most likely already be pre populated)
- Group ID: You will get this from support or you will already know what group you want to enroll in.
After entering the group ID, you will then be asked for a username and password.
- Enter the username ( a ) and password ( a ).
- Then tap on NEXT.
This will complete the enrollment process, and you will automatically be routed to the hub app and met with the message "Congratulations! You have successfully enrolled your device."
It will take 0 to 10 minutes for any assigned apps to appear in the catalog. After this wait, all app assignments will populate under the "app catalog" ready to be installed.
If the Device is Not in Knox But on Android 10 and Above:
Always begin in a factory reset state. See the beginning of the article for instructions on how to factory reset your device.
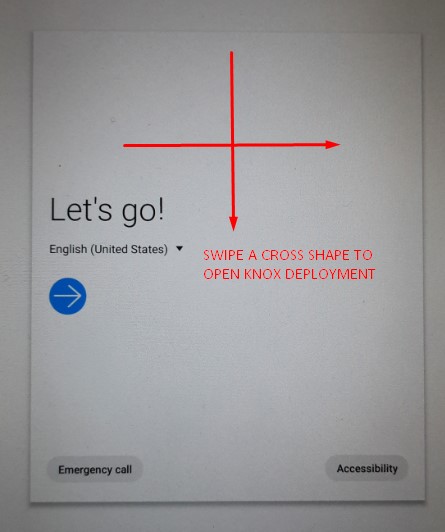
- After the device is factory reset and before the network or language screen, on the "Welcome" or "Let's go!" screen make a cross with your finger in the Blank space.

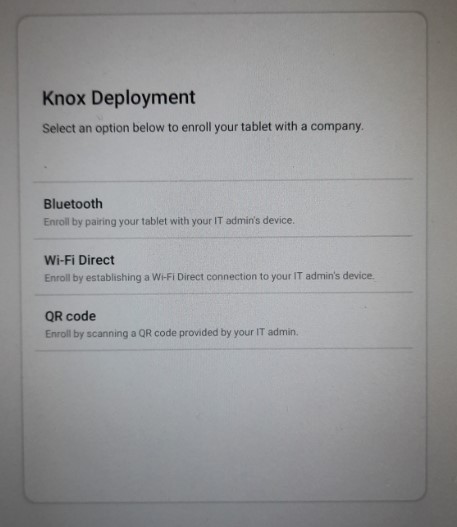
- The + pattern will launch the Knox deployment screen, and then you select scan QR code.

- You then scan the QR code below and it will begin the enrollment process.
If the Device is Not in Knox but on Android 9 and Below:
Always begin in a factory reset state. See the beginning of the article for instructions on how to factory reset your device.
- Once the device comes back online from the reset, go through the setup steps.
- Go through the language selection and connect to a WiFi network.
- You will then be asked to sign into your Gmail account.
- At this point in the process, you want to enter in "afw#bub" as seen in the screenshot below.
- This will automatically install the hub app.
- Once the hub app installs you then select click on scan QRcode at the enrollment option screen.
- You can then scan the QR code below to complete the enrollment process.
- After the enrollment is completed, please reach out to support and ask them to move your device to the correct group as this process will put your device in a default group.
- In order to see the correct application assignments you will need to provide your serial number to support and they will have to manually move it to the correct group.
Comments
0 comments
Please sign in to leave a comment.