Description: Learn how to set up and configure the Customer-facing Display and specify the correct payment device on your SkyTab POS to ensure accurate customer interaction and payment processing.
Note: If you haven’t yet installed your Display, visit the Install and Connect the Customer-facing Display article to configure it in the POS system.
Enable the Display on SkyTab POS
- On SkyTab POS, go to Manager > Settings > Hardware > Customer Display.
- Select Enable Remote Display.
- The default values should be:
- IP: 127.0.0.1
- Customer Display Port: 65105
-
POS Port: 65107
Select the desired field and enter the correct value if the current value is incorrect.
- Select Save.
Specify the Payment Device
- Go to Manager > Settings > Hardware > Payment Devices and select the dropdown for "Payment Device."
- Select External PIN Pad if you are using an external PIN Pad, or Onboard Reader if you are using L1400 or the Display to take payments.
- Select OK and Save.
Internal:
United States
Display Troubleshooting
When installing the Display, if unable to go past the QR Code screen to show the business name or splash screen, try the following steps:
- If the Display is docked, reseat it. If it’s connected by cable, re-plug it on both ends.
- In Android Settings > Display, check if WiFi is disabled.
- There are no ports listed in the Display device settings.
- Make sure that applications and firmware versions are on the Gold Standard version.
- Restart the Display with the power button.
- Disable/Enable the Display in Manager > Settings > Hardware > Customer Display.
- Force Stop the SkyTab POS Application.
Push A3700 BroadPOS Lite Template
- On the Terminal Details screen, select Push Task at the top left.
- On the Push Task screen, select +Push App at the top right.
- To push the Display template to the device:
- Check the Shift4 Gold Standard Matrix Guide under SkyTab POS > United States > Customer Facing Display (A3700) to find the latest template.
- Select Push Template at the top left.
- Enter the template name in the search bar on the top right .
- Select the template from the list and select OK.
- On the Push Task Configuration screen, select the Shift4 section.
- Scroll to the Merchant Parameters section and paste the access token into the "Access Token" section.
- Scroll down and select Save and Next at the bottom right.
- Set the Force Update toggle ON, then select Activate.
- It could take some time, depending on the merchant’s internet connection. If the file build push is successful, a green checkmark appears as "Completed" in the PAXSTORE.
Push BroadPOS Manager Application
- Navigate to Terminal Details > Push Task > App and select +Push App at the top right.
- On the Add Push App window, do the following:
- Check the Shift4 Gold Standard Matrix Guide under SkyTab POS > United States > Customer Facing Display (A3700) to find the latest BroadPOS Manager application.
- Select App at the top left.
- Enter BroadPOS Manager in the search bar at the top right, and select Enter.
- Select the BroadPOS Manager application version that you found in the Gold Standard Matrix.
- Select OK.
- Set the Force Update toggle ON and select Activate.
- It could take some time, depending on the merchant’s internet connection. If the file build push is successful, it will show a green checkmark as "Completed" in the PAXSTORE.
Push RKI
Before pushing the RKI, verify that it was not already pushed by visiting the Verify Remote Key Injection article.
- Navigate to Terminal Details > Push Task > RKI and select +Push RKI at the top right.
- Select View All on the right.
- Select the Shift4_P2Pe template and select OK at the bottom right.
- On the Add Push RKI window, select OK.
- On the Push Task Configuration screen, select Activate.
It could take some time, depending on the merchant’s internet connection. If the RKI push is successful, it will show a green checkmark as "Completed" in the PAXSTORE.
Date & Time Settings
- Remote into the Display (A3700) via AirViewer, select 10 times in the top-right corner.
- On the Advanced Menu screen, enter the PIN, which is the current date in MMDDYYYY format, and select the blue checkmark on the bottom right.
Note: Use the left mouse button when entering the password. - On the Advanced menu, select Android Settings.
- Scroll to the bottom under Settings and select System, then select Date & time.
- If you notice that it’s set to the incorrect time zone, disable the Automatic time zone setting and choose Select time zone.
- Select the Region and type in the region of the location: United States.
- Select System and enable Automatic time zone.
Confirm Gold Standard Versions
Check the Gold Standard under SkyTab POS > United States > Customer-facing Display (A3700) and verify that BroadPOS Lite, BroadPOS Manager, Customer Display, and Firmware are all up to date. If any are outdated, please update.
Important: Make sure the Display application is up to the US’s Gold Standard version so that everything works without any issues.
Test Payment
Once the POS system has a Display configured, log in to SkyTab POS with a PIN. Then, touch Order and run the test transaction on the POS Terminal. When it is completed, make sure the payment is in Sale Status in the Transaction Manager or Global Payments Merchant Portal.
Canada
Display Troubleshooting
When installing the Display, if unable to go past the QR Code screen to show the business name or splash screen:
- If the Display is docked, reset it. If it’s connected by cable, re-plug it on both ends.
- Check if WiFi is disabled in the Android settings under Display.
- There are no ports listed in the Display device settings.
- Make sure that applications and firmware versions are on the Gold Standard version.
- Restart the Display with the power button.
- Disable/Enable Display in Manager > Settings > Hardware > Customer Display.
- Force Stop the SkyTab POS Application.
Push A3700 BroadPOS Lite Template
- On the Terminal Details screen, select Push Task at the top left.
- On the Push Task screen, select +Push App at the top right.
- To push the Customer Facing Display template to the device:
- Check the Shift4 Gold Standard Matrix Guide under SkyTab POS > Canada > Customer Facing Display (A3700) to find the latest template.
- Select Push Template at the top-left.
- Enter the template name in the search bar on the top right.
- Select the template from the list and select OK.
- On the Push Task Configuration screen, select the Shift4 section.
- Scroll to the Merchant Parameters section and paste the access token into the "Access Token" section.
- Scroll down and select Save and Next at the bottom right.
- Set the Force Update toggle ON and select Activate.
- It could take some time, depending on the merchant’s internet connection. If the file build push is successful, it will show a green checkmark as "Completed" in the PAXSTORE.
Push BroadPOS Manager Application
- Navigate to Terminal Details > Push Task > App and select +Push App at the top right.
- On the Add Push App window, do the following:
- Check the Shift4 Gold Standard Matrix Guide under SkyTab POS > Canada > Customer Facing Display (A3700) to find the latest BroadPOS Manager application.
- Select the App button at the top left of the window.
- Enter the “BroadPOS Manager” keyword into the search bar at the top right of the window and select Enter.
- Select the BroadPOS Manager application version that you found in the Gold Standard Matrix.
- Select OK.
- Set the Force Update toggle ON and select Activate.
- It could take some time, depending on the merchant’s internet connection. If the file build push is successful, it will show a green checkmark as "Completed" in the PAXSTORE.
Push RKI
Before pushing the RKI, verify that it was not already pushed by following the Verify Remote Key Injection guide.
- Navigate to Terminal Details > Push Task > RKI and select +Push RKI at the top right.
- Select View All on the right side.
- Select the Shift4_Canada_PIN_Slot1_DATA_Slot2 template and select OK at the bottom right.
- On the Add Push RKI window, select OK.
- On the Push Task Configuration screen, select Activate.
It could take some time, depending on the merchant’s internet connection. If the RKI push is successful, it will show a green checkmark as "Completed" in the PAXSTORE.
 Date & Time Settings
- Remote into Display (A3700) via AirViewer, select 10 times in the top-right corner.
- On the Advanced Menu screen, enter the pin code, which is the current date in MMDDYYYY format, and select the blue checkmark on the bottom right.
Note: Use the left mouse button when entering the password. - On the Advanced menu, select the Android Settings option.
- Scroll to the bottom under Settings to System, and select it. Then, select Date & time.
- If you notice that it’s set to the incorrect time zone, disable the Automatic time zone setting and choose Select time zone.
- Select the Region and type in the region of the location: Canada.
- Select System and enable Automatic time zone.
Confirm Gold Standard Versions
Check the Gold Standard under SkyTab POS > Canada > Customer Facing Display (A3700) and verify that BroadPOS Lite, BroadPOS Manager, Customer Display, and Firmware are all up to date. If any are outdated, update.
Important: Make sure the Display application is up to Canada’s Gold Standard version so everything works without any issues.
Test Payment
Once the POS system has a Display configured, log in to SkyTab POS with a PIN. Then, touch Order and run the test transaction on the POS Terminal. When it is completed, make sure that the payment is in the Sale Status in the Transaction Manager or Global Payments Merchant Portal.
Ireland/Spain
Display Troubleshooting
When installing the Display and are unable to go past the QR Code screen to show the business name or splash screen, try the following steps:
- If the Display is docked, reseat it. If it’s connected by cable, re-plug it on both ends.
- Check if WiFi is disabled in the Android settings under Display.
- There are no ports listed in the Display device settings.
- Make sure that applications and firmware versions are on the Gold Standard version.
- Restart the Display with the power button.
- Disable/Enable Display in Manager > Settings > Hardware > Customer Display.
- Force Stop the SkyTab POS Application.
Push A3700 BroadPOS Lite Template
- On the Terminal Details screen, select Push Task at the top left.
- On the Push Task screen, select +Push App at the top right.
- To push the Display template to the device:
- Check the Shift4 Gold Standard Matrix Guide under SkyTab POS > UK/EU > Customer Facing Display (A3700) to find the latest template.
- Select Push Template at the top left.
- Enter the template name in the search bar on the top right.
- Select the template from the list and select OK.
- On the Push Task Configuration screen, select the Shift4 section.
- Scroll to the Merchant Parameters section and paste the access token into the "Access Token" section.
- Select the Region section from the top menu and:
- Deployment Region: Lithuania
- Primary Display Language: English-UK
- Scroll down and select Save and Next at the bottom right.
- Set the Force Update toggle ON and select Activate.
- It could take some time, depending on the merchant’s internet connection. If the file build push is successful, it will show a green checkmark as "Completed" in the PAXSTORE.
Push BroadPOS Manager Application
- Navigate to Terminal Details > Push Task > App and select +Push App at the top right.
- On the Add Push App window, do the following:
- Check the Shift4 Gold Standard Matrix Guide under SkyTab POS > UK/EU > Customer Facing Display (A3700) to find the latest BroadPOS Manager application.
- Select App at the top left of the window.
- Enter BroadPOS Manager into the search bar at the top right, and select Enter.
- Select the BroadPOS Manager application version that you found in the Gold Standard Matrix.
- Select OK.
- Set the Force Update toggle ON, and select Activate.
- It could take some time, depending on the merchant’s internet connection. If the file build push is successful, it will show a green checkmark as "Completed" in the PAXSTORE.
Push RKI
Before pushing the RKI, verify that it was not already pushed by following the Verify Remote Key Injection guide.
- Navigate to Terminal Details > Push Task > RKI and select +Push RKI at the top right.
- Select View All on the right side.
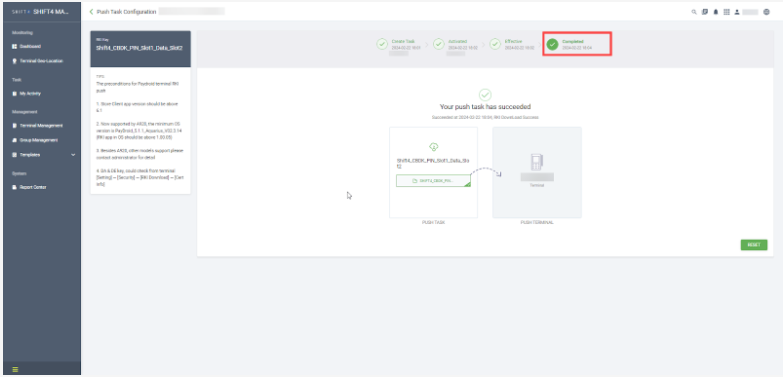
- Select the Shift4_CBDK_PIN_Slot1_Data_Slot2 template and select OK at the bottom right.
- On the Add Push RKI window, select OK.
- On the Push Task Configuration screen, select Activate.
Date & Time Settings
- Remote into the Display (A3700) via AirViewer, select 10 times in the top-right corner.
- On the Advanced Menu screen, enter the PIN, which is the current date in MMDDYYYY format, and select the blue checkmark on the bottom right.
Note: Use the left mouse button when entering the password.
- On the Advanced menu, select Android Settings.
- Scroll down to the bottom under Settings to System, and select it. Then, select Date & time.
- If you notice that it’s set to the incorrect time zone, disable the Automatic time zone setting and choose Select time zone.
- Select the Region and type in the region of the location: Ireland.
- Select System and enable Automatic time zone.
Confirm Gold Standard Versions
Check the Gold Standard under SkyTab POS > UK/EU > Customer Facing Display (A3700) and verify that BroadPOS Lite, BroadPOS Manager, Customer Display, and Firmware are all up to date. If any are outdated, then update.
Test Payment
Once the POS system has a Display configured, log in to SkyTab POS with a PIN. Then, select Order and run the test transaction on the POS Terminal. Once completed, verify that the payment has both "Captured" and "Sale" by following the steps below:
- Navigate to the Transactions section.
- Log in to Lighthouse Business Manager.
- Select Transactions.
- Select All Transactions.
- Confirm that you can locate the transaction with the status "Captured" and "Sale."
Note: Please allow a couple of minutes for the information to sync up.
If the transaction doesn’t appear in Lighthouse Business Manager, you can use the Search for an Account and Access Insights in EU Salesforce or LBM 2.0 guide, or give it a little more time.
United Kingdom
Display Troubleshooting
When installing the Display, if unable to go past the QR Code screen to show the business name or splash screen, try the following steps:
- If the Display is docked, reseat it. If it’s connected by cable, re-plug it on both ends.
- Check if WiFi is disabled in the Android settings under Display.
- There are no ports listed in the Display device settings.
- Make sure that applications and firmware versions are on the Gold Standard version.
- Restart the Display with the power button.
- Disable/Enable Display in Manager > Settings > Hardware > Customer Display.
- Force Stop the SkyTab POS Application.
Push A3700 BroadPOS Lite Template
- On the Terminal Details screen, select Push Task at the top left.
- On the Push Task screen, select +Push App at the top right.
- To push the Display template to the device, do the following:
- Check the Shift4 Gold Standard Matrix Guide under SkyTab POS > UK/EU > Display (A3700) to find the latest template.
- Select Push Template at the top-left.
- Enter the template name in the search bar on the top right.
- Select the template from the list and select OK.
- On the Push Task Configuration screen, select the Shift4 section.
- Scroll to the Merchant Parameters section and paste the access token into the "Access Token" section.
- Scroll down and select Save and Next at the bottom right.
- Set the Force Update toggle ON, and select Activate.
- It could take some time, depending on the merchant’s internet connection. If the file build push is successful, it will show a green checkmark as "Completed" in the PAXSTORE.
Push BroadPOS Manager Application
- Navigate to Terminal Details > Push Task > App and select +Push App at the top right.
- On the Add Push App window:
- Check the Shift4 Gold Standard Matrix Guide under SkyTab POS > UK/EU > Display (A3700) to find the latest BroadPOS Manager application.
- Select App at the top left of the window.
- Enter the “BroadPOS Manager” keyword into the search bar at the top right of the window and select Enter
- Select the BroadPOS Manager application version that you found in the Gold Standard Matrix.
- Select OK
- Set the Force Update toggle ON and select Activate.
- It could take some time, depending on the merchant’s internet connection. If the file build push is successful, it will show a green checkmark as "Completed" in the PAXSTORE.
Push RKI
Before pushing the RKI, verify that it was not already pushed by following the Verify Remote Key Injection guide.
- Navigate to Terminal Details > Push Task > RKI and select +Push RKI at the top right.
- Select View All on the right side.
- Select the Shift4_CBDK_PIN_Slot1_Data_Slot2 template and select OK at the bottom right.
- On the Add Push RKI window, select OK.
- On the Push Task Configuration screen, select Activate.
Date & Time Settings
- Remote into Display (A3700) via AirViewer, select 10 times in the top-right.
- On the Advanced Menu screen, enter the PIN code, which is the current date in MMDDYYYY format, and select the blue checkmark on the bottom right.
Note: Use the left mouse button when entering the password.
- On the Advanced menu, select Android Settings.
- Scroll to the bottom under Settings to System, and select it. Then, select Date & time.
- If you notice that it’s set to the incorrect time zone, disable the Automatic time zone setting and choose Select time zone.
- Select the Region and enter the region of the location: United Kingdom.
- Select System and enable Automatic time zone.
Confirm Gold Standard Versions
Check the Gold Standard under SkyTab POS > UK/EU > Display (A3700) and verify that BroadPOS Lite, BroadPOS Manager, Customer Display, and Firmware are all up to date. If any are outdated, they must be updated.
Test Payment
Once the POS system has a Display configured, log in to SkyTab POS with a PIN. Then, select Order and run the test transaction on the POS Terminal. Once completed, verify that the payment has both "Captured" and "Sale" by following the steps below:
- Navigate to the Transactions section.
- Log in to Lighthouse Business Manager.
- Select Transactions.
- Select All Transactions.
- Confirm that you can locate the transaction with the status "Captured" and "Sale."
Note: Please allow a couple of minutes for the information to sync up.If the transaction doesn’t appear in Lighthouse Business Manager, you can use the Search for an Account and Access Insights in EU Salesforce or LBM 2.0 guide, or give it a little more time.
Comments
0 comments
Please sign in to leave a comment.