Description: Learn to navigate the Host Mode Table Layout, manage Wait List entries, and handle Reservations on the Shift4 Dine.
Jump to a section by selecting a link below:
For instructions on assigning tickets to tables, visit Assign a Ticket to a Table in Host Mode.
To watch more how-to videos, visit our video section.
Host Mode Overview
- Log in to Shift4 Dine Workstation and access the Table Layout screen via the Host tab at the top of the screen.
- The system can automatically open Host Mode when you log in by setting the Login option under User Settings to “Host Mode” when creating a job.
Note: The Table Layout can only be edited in Shift4 Dine Customer Hub. Log in to the Customer Hub to set up Sections and Tables before interacting with them on the Workstation.
Switching Layouts
You can change between different table layouts by tapping the layout name (e.g., Dine In and Patio).
Table Colors and Statuses
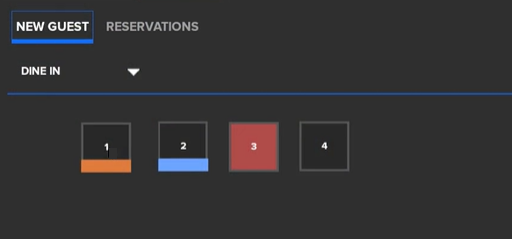
The table color indicates when an order has been assigned to it (or displays nothing if a Wait List entry has been assigned). A colored line at the bottom of the table will be highlighted with a colored bar based on the table’s ticket status:
- Orange: A party has been assigned; A ticket may be opened, but it won't turn blue until items are added and sent.
- Blue: A party has been assigned a ticket and at least 1 item has been added.
- Red: The ticket has been paid and the table has been marked dirty.
Primary Table Statuses
A table can be assigned one of four primary statuses. These statuses are shown along the bottom of the screen and can be assigned if one or more tables have been selected from the Table Layout screen. These statuses are as follows:
- Available: The table is ready to be assigned.
- Close: The table is currently unavailable for seating at this time.
- Dirty: The table was recently vacated and still needs to be cleaned before a new party can be seated.
- Clean: The table has been cleaned and is ready to be assigned.
You can also Select All or Deselect All of the tables by using the buttons at the bottom of the screen.
Wait List Management
To watch more how-to videos, visit our video secti
Use the Wait List when all tables are occupied or unavailable.
Add a Party to the Wait List:
- Enter the guest's name or select them from the customer database, and enter the party size.
- Tap the Add To Wait List button.
- Enter phone number for notification and select contact method (Call, Text, None).
- Tap Ok.
Seat or Assign a Party:
- When a table becomes available, tap the table, then tap the Wait List entry.
- Tap Assign to assign the party to the selected table.
- Tap Seat to finalize the entry and remove them from the waiting list.
- Tap Ok.
- A ticket is created for the guests.
Note: After assigning, visit Assign a Ticket to a Table in Host Mode for opening the ticket.
- A ticket is created for the guests.
Wait List Entry Details:
Selecting a Wait List entry displays:
- Arrived: The time the entry was created
- Wait Time: The length of time since the entry was created
- Customer Name: The customer name that was chosen when the entry was created
- Assigned: The user's name who entered the order
- # People: The number of people within the party
Actions on a Wait List Entry:
-
Edit: Opens the Edit Guest dialog to modify Table Name/Customer, Party Size, Phone Number, Preferred Contact Method, or Notes.
- Cancel: Closes without saving changes
- Save: Commits changes
- Remove From List: Deletes the entry without creating an order
- Notify: Sends a text or pre-recorded call to the customer based on the preferred contact method
- Seat: Converts the entry into an Order; finalize by tapping OK. The new order appears in the Open Orders section.
-
Assign: Only available when a table is selected. Assigns the party to the table and allows opening a ticket.
Note: After assigning a table, visit Assign a Ticket to a Table in Host Mode for opening the ticket.
Sorting Wait List:
- Wait Time: Oldest first
- Recently Arrived: Most recent first
- No Table: Entries without table assignment first
- Largest Party: Largest party first
Reservations
If using Reservations:
- Tap the Reservations tab in Host Mode to view a calendar and list of reservations.
- Navigate months using left/right arrows. Days with reservations display a small blue triangle and the number of reservations.
- Selecting a date highlights it in orange and displays all reservations for that day.
Adding a New Reservation
- Tap Add Entry + to open the Create Reservation dialog box.
- Enter the required information:
- Custom Name or select an existing customer
- Party Size
- Date & Time of reservation
- Contact Number
- Preferred Method of Contact
- Additional notes, comments, or customer requests (optional)
- Method, Notes (optional).
- Tap Ok to save or Cancel to discard.
Reservations List:
The Reservations List is displayed on the left side of the screen.
- Sorting: Use the dropdown to sort entries by Time, Name, or Party Size.
-
Reservation Details: Selecting an entry shows the following information:
- Time: Time the reservation is scheduled for
- Status: Current reservation status (Not Here Yet, Arrived, Seated, Canceled, Closed)
- Customer Name: Name of the party
- # People: Number of people in the party
- Assigned: Table assigned to the reservation
Actions on a Reservation Entry:
- Edit: Modify any reservation details. Tap OK to save or CANCEL to discard changes.
- Notify: Send a text or pre-recorded call to the customer
-
Status: Update the reservation status: Not Here Yet, Arrived, Seated, Canceled, or Closed.
-
Assign: Assign the party to a table (requires a table to be selected.)
Note: After assigning a table, visit Assign a Ticket to a Table in Host Mode for opening the ticket.
Comments
0 comments
Please sign in to leave a comment.