Description: When you have parties that are on a wait because there is no table currently available to accommodate the party's size or request, you can manually enter and organize these tables/parties on your Reservations Waitlist. Review how to add entries to your Waitlist and manage them and the various notification options below.
- Entering a New Party on Your Waitlist
- Understanding a Party’s Details on the Waitlist
- Editing your Party’s Details on the Waitlist
- Notification Options for "Table Ready" Status
- Notifying a Party When the Table is Ready
- Assigning Your Party on the Waitlist to a Table
- Sorting Your Waitlist
- Removing a Party from Your Waitlist
Entering a New Party on Your Waitlist

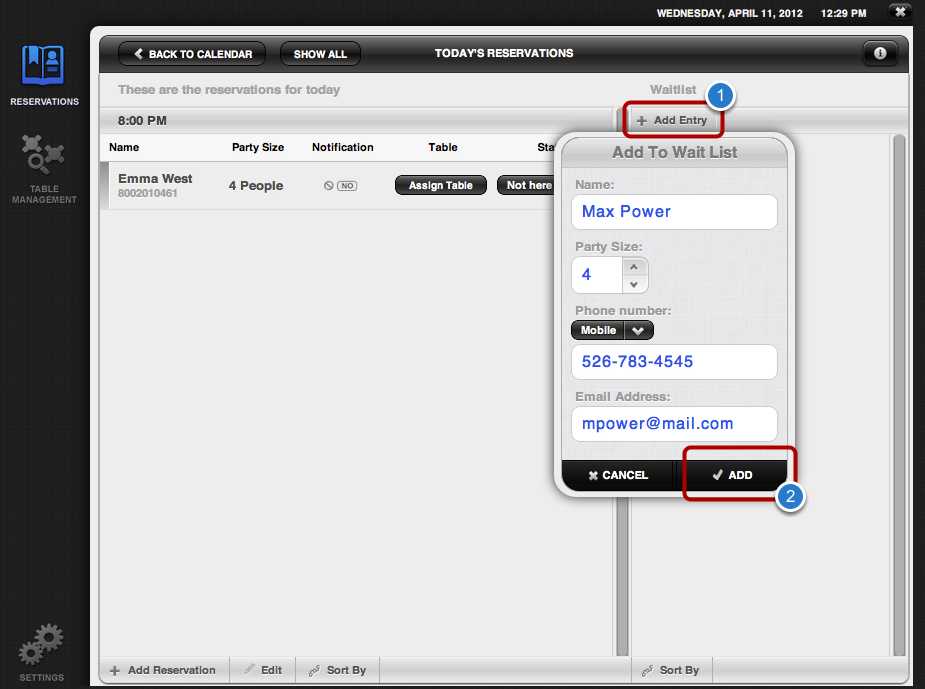
- Select Add Entry, and enter your party’s information.
- Select Add to confirm, save, and amend your details to the Waitlist.
- Required Fields include:
- Name
- Party Size
- If your party wishes to be notified when their table is ready, you must take their phone number as well.
- Required Fields include:
Understanding a Party’s Details on the Waitlist
If added by the order taker/host, each waitlist entry may contain and display the following information: We recommend entering as much information as possible for the best possible results.
You may enter and view the following:
- Party Name
- Party Size
- Phone Number
- Notification preference
- Arrival Time
- Wait Time
Editing your Party’s Details on the Waitlist
How to Edit a Party’s Details on the Waitlist
- Select the party name you want to edit.
- Note: Do not select the notification icon. This is used for another management function. Instead, select the actual party’s name.
- Select Edit in the Edit Waitlist Entry pop-up to adjust the following options:
- Party Name (Name)
- Party Size (Quantity)
- Phone Number (not required)
- Email Address (not required)
- Edit the information necessary, then select Done to save your changes and close the pop-up window.
Notification Options for "Table Ready" Status
If the party has to wait for a table, they may wish to go offsite. If the party leaves your establishment while waiting for their table, you can send them a notification when their table is ready.
If Party Wants to be Notified when Table Ready
- Select the Notification icon.
- Choose the preferred notification from the Table Ready Notification pop-up.
- Notification options include:
- by SMS (text message)
- by Phone (phone call)
- None (no notification will occur)
- Notification options include:
If the party wishes to be notified by SMS or phone, you must take a phone number from the party.
Notifying a Party When the Table is Ready
When the party’s table is ready, you will want to send a notification using the preferred notification option they previously chose.
How to Send Party a Notification the Table is Ready
- Select on the party’s name.
- Note: Do not select the “Notification Icon.” Select the actual party’s name.
- In the Edit Waitlist Entry, select Table Ready Notification.
- Select the notification that your party chose.
A “Notification successfully sent!” pop-up will open, confirming that the party has received their table-ready notification.
Assigning Your Party on the Waitlist to a Table
When the party is ready to be seated, you can assign a table for them.
How to Assign a Table to a Party
- Select the name of the party you want to assign a table to.
- Note: Only select the party name. Do not select the “Notification” icon.
- Select on Table in the Edit Waitlist Entry pop-up.
An “Assign Table” pop-up will appear.
- Select the table you want to assign the party to.
- Then select Done to save and close.
Once you assign a table for the party, they will be removed from the waitlist.
Sorting Your Waitlist
You may sort the Waitlist up to one of three different ways outlined below:
-
- By Party Size
- By Name
- By Time
An example of the Waitlist > Sort By feature:
How to Sort the Waitlist
Select the Waitlist button to open your current Waitlist and display the entries available.
At the bottom of the Waitlist screen/side-screen, select the Sort By button under the Waitlist column located at the bottom left of the Waitlist window.
In the Sort By pop-up, select the option you wish to sort by.
- Your entries will automatically be sorted by the option you select moving forward.
- To adjust or change your Sort By option, select Sort By again and choose the option you desire.
- You may change the Sort By option at any time.
- You can sort your Waitlist in three ways:
- By Party Size
- By Name
- By Time
- To choose how you would like to sort your Waitlist entries, select the Sort By button under the Waitlist column.
- In the “Sort By” pop-up, select the option you wish to sort by. Your entries will automatically be sorted by the option you select.
Removing a Party from Your Waitlist
If a party decides to take themselves off the waitlist, you can remove the party from the Waitlist by:
- Select the party’s name.
- Select Remove Entry on the Edit Waitlist Entry pop-up.
To open the Edit Waitlist Entry pop-up, select only the party’s name, do not select the notification icon.
A second box will pop up asking you to confirm entry removal. Select Yes, remove this entry if that is the party you wish to remove.
Comments
0 comments
Please sign in to leave a comment.