Description: Learn how to add a new menu item in Hospitality and how to edit and reorganize menu items to meet the merchant’s personal preferences.
Menu Items Screen
To access this section of the POS, select Manager in the upper right corner of the Order Entry screen. Select Menu, and the page should default to Menu Items. If it does not, ensure Menu Items is highlighted before continuing:
- To add a menu item, select New at the bottom of the screen.
- To edit an existing menu item:
- Select the menu item from the right side of the screen.
- Press Edit at the bottom of the screen to open the Edit Menu Item window.
- Make the desired changes to the menu item.
- Select OK when complete to commit the changes.
Note: Selecting Save as New Item will save the current item but keep the Edit Menu Item screen open to allow for the continued addition of items into the system.

Reorganize Menu Items
The order in which the menu items are listed on the right side of the Menu, Revenue, and Tax Setup screen determines the order in which they appear on the Order Entry screen and the print order (keeping in mind the print order of the associated Item Groups).
To reorganize them:
- Select the menu item you would like to reorder.
- Use the arrow buttons to the far right of the list to move the screen category up or down.
- You can also select ABC to place the screen categories in alphabetical order.
Edit Menu Items
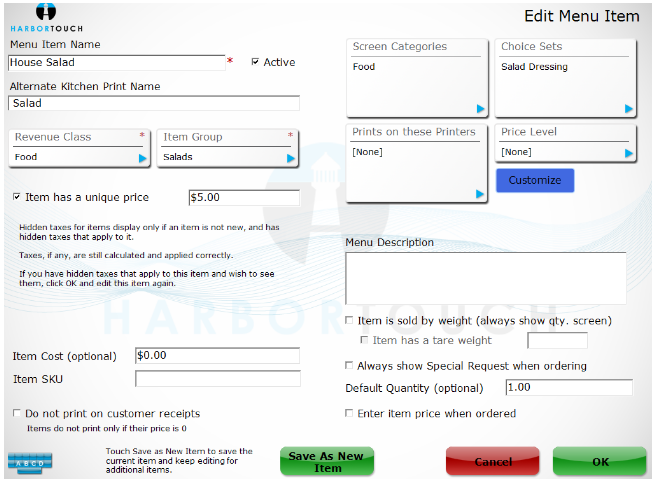
- Menu Item Name: Enter a descriptive name that will allow you to easily recognize the menu item.
- Active: Enables the menu item to be selected on the Order Entry screen.
- Alternate Kitchen Print Name: This text will be printed on the kitchen receipts only. This is useful for items with long or confusing names and is also commonly used for businesses with multiple language preferences.
- Revenue Class: Allows you to select the preprogrammed revenue class that this item belongs to by tapping the box, selecting the appropriate revenue class, and selecting OK.
- Item Group: Allows you to select the preprogrammed item group that this item belongs to by tapping in the box, selecting the appropriate item group, and selecting OK.
- Item has a unique price: If the menu item is not going to adopt the price of its assigned item group, select the check box and enter the desired price.
- Item Cost: Enter the cost (to the merchant) of menu items to track expenses incurred by the restaurant.
- Item SKU: Add the menu item's SKU (stock keeping unit) number, if applicable.
- Do not print on customer receipts: This can only be utilized if the item price is set to zero, and will omit printing these items on the receipt.
- Screen Category: Select the preprogrammed screen category that this item belongs in by tapping the box, selecting the appropriate screen category, and selecting OK.
- Choice Sets: Select the preprogrammed choice sets that this item belongs in by tapping the box, selecting the appropriate choice sets, and selecting OK.
- Prints on these Printers: Select the preprogrammed printers to which these items may print by tapping the box, selecting the appropriate printers, and selecting OK.
- Price Level: Set a price level for the menu item's preprogrammed choices; tap on the price level box to see the available choices, make your selection, and select OK.
- Customize: Alter the default prices of the applicable choices once a price level is chosen; select OK when complete.
- Menu Description: Enter a description of the menu item.
- Item is Sold by Weight: Indicates if the item’s price depends on its weight.
- Item has Tare Weight: A tare weight (amount to be subtracted from the weight total) option entered for items being weighed on a scale.
- Always Show Special Request When Ordering: Activates function prompts the order taker to enter additional information and may also be used for daily specials that share a daily price change.
- Default Quantity: Determines the default item quantity that is added to the ticket.
- Enter Item Price When Ordered: Sets up an open item that prompts the user to enter a price whenever the item is selected from the Order Entry screen.
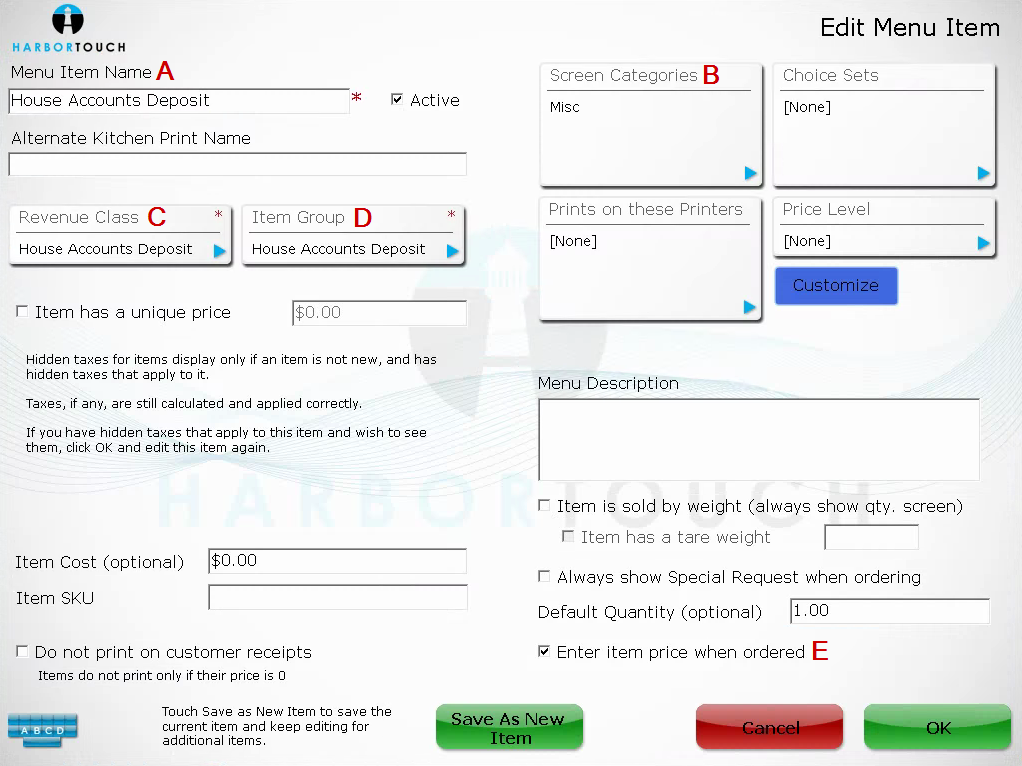
Configure Menu Items for House Accounts
- A: Menu Item Name: The House Accounts Menu Item is always configured with “House Accounts Deposit” as the standard naming convention.
- B: Screen Categories: Tap the box, select Misc, then select OK.
- C: Revenue Class: Tap the box, select House Accounts Deposit, then select OK.
- D: Item Group: Tap the box, select House Accounts Deposit, then select OK.
- E: Enter item price when ordered: Check this box.
- Select OK.
Comments
0 comments
Please sign in to leave a comment.