Description: Learn which items you can edit before your party arrives and how you can edit them below.
- Editing Reservations
- Notifications
- Adding Reservations
- Sorting Reservations
- Table Management
- Quick Status in Table Management
- Returning to your Setup Wizard
- Show All Feature
Editing Reservations
Review the various ways in which a user may edit a Reservation below.
Editing Reservations Before Your Party Arrives
You can edit reservation details in two ways:
- Double-click on the party’s name (1).
- Click once on the party’s name (1) to highlight the reservation you wish to edit, and click Edit (2).
Editing Reservations Details
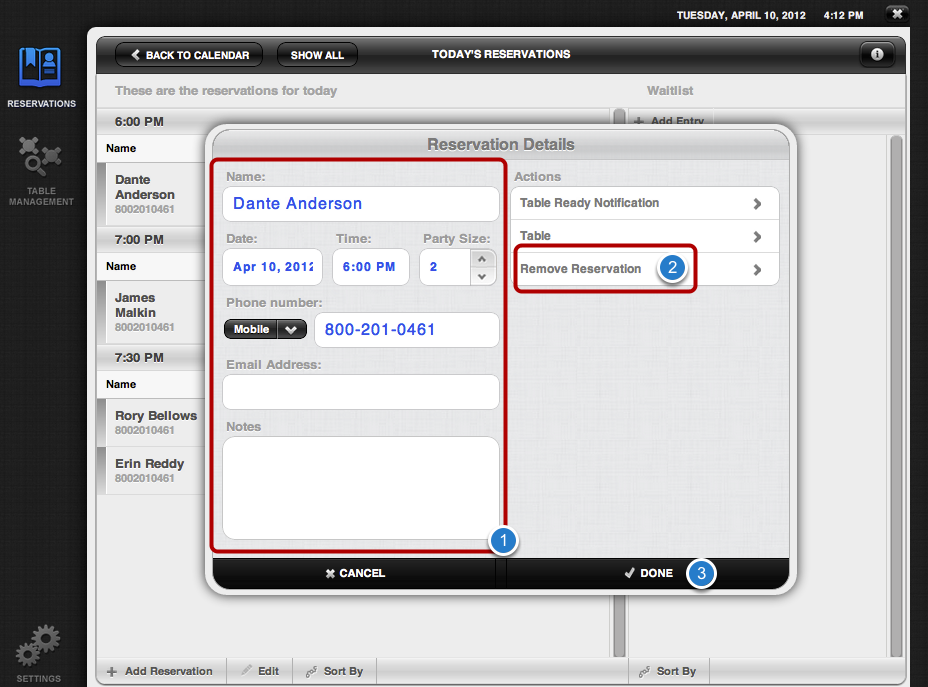
Details that you can edit before your party arrives are: name, party size, date and time of reservation, phone number, email address, and notes. (1).
You can also remove the reservation completely (2).
When you are finished, click Done (3).
Editing Reservations After Your Party Arrives
When your party arrives, you will want to update their status, as well as assign a table for them. If the party has to wait to be seated for any significant amount of time, you may ask them if they wish to be notified once their table is ready. If your party wants to be notified, ask them which notification option they prefer.
Review below how to update your party’s status and notification preference, as well as how to assign a table.
Updating your party’s status to “Arrived”
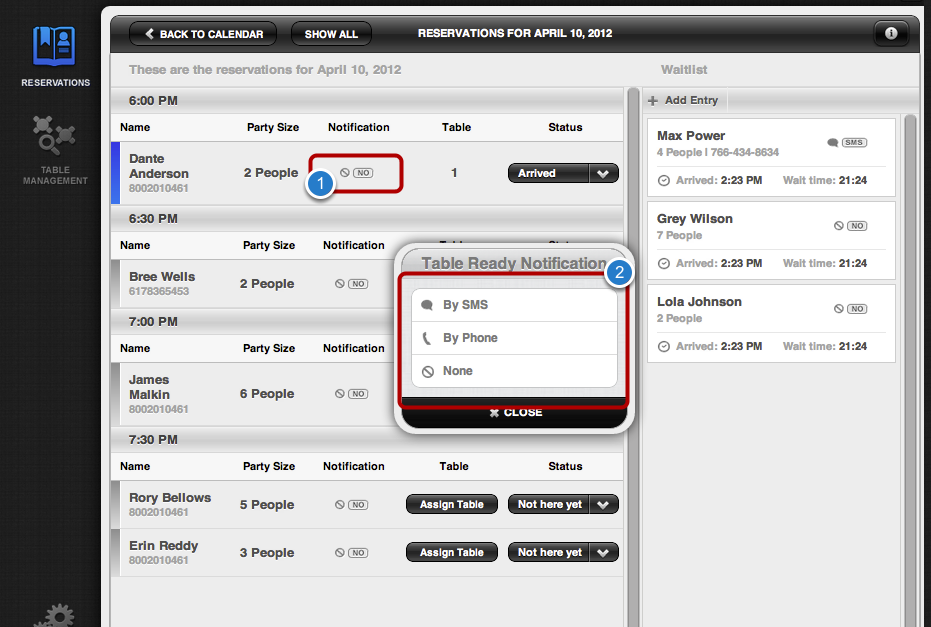
When your party arrives, you must update their status to “Arrived.”
To change your party’s status to “Arrived”:
- Click on the Status drop-down menu (1).
- Select Arrived.
Notifications
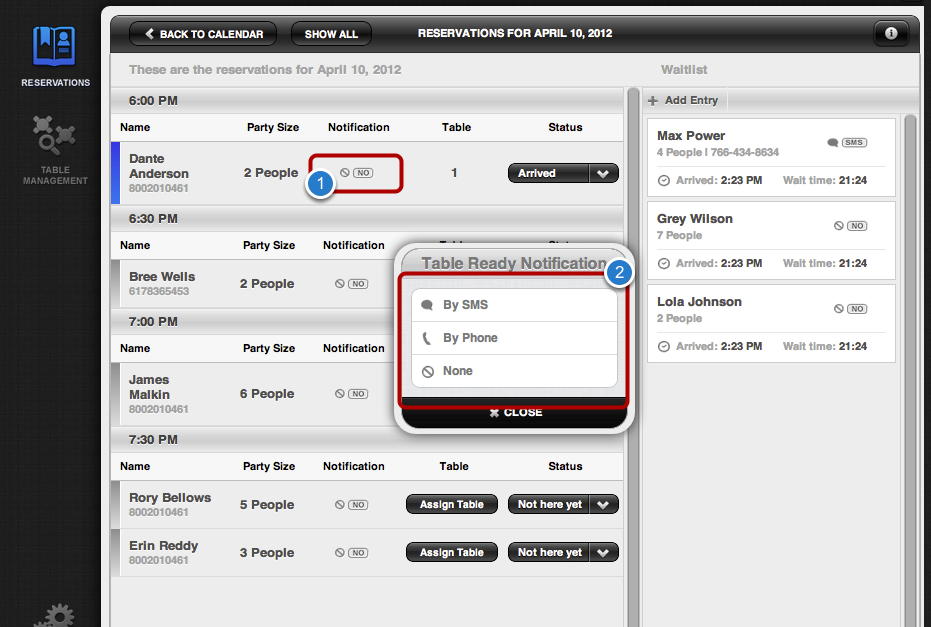
If your party must wait a few moments for their table, you can ask them how they would like to be notified when their table is ready. Notification options include: By SMS (text message), by phone or none.
To select a notification option:
- Click on the Notification icon.
- Then click on one of the three options your party chooses in the Table Ready Notification pop-up.
- If your party wishes to be notified by SMS or phone, you must take a phone number for the party.
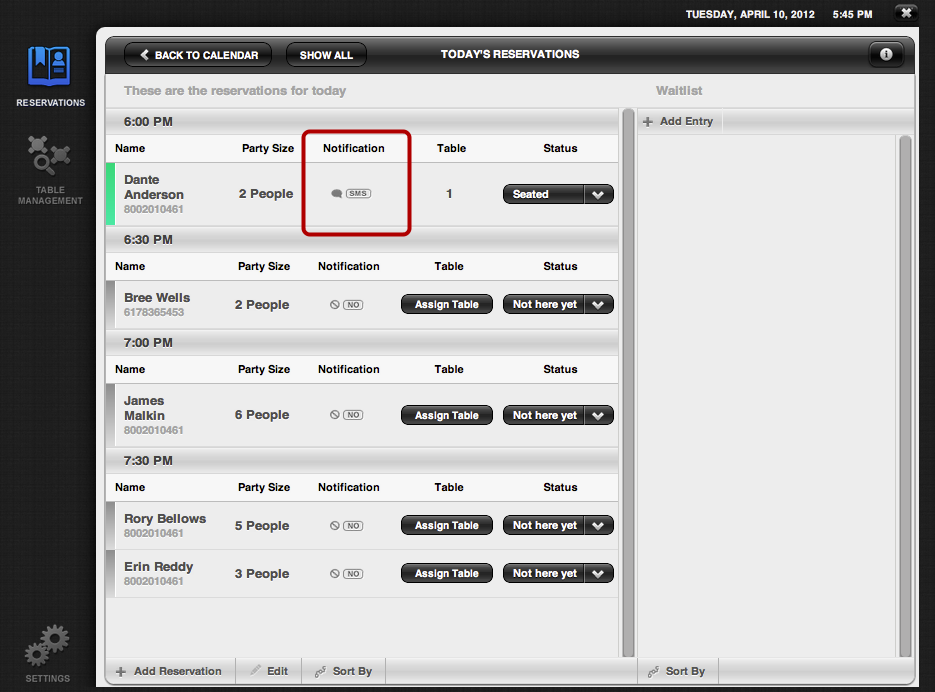
Your party’s notification option will be updated.
Assigning a Table for Your Party
When your party is ready to be seated, you must assign a table for them.
- ONLY ASSIGN A TABLE WHEN YOUR PARTY IS READY TO BE SEATED.
- To assign a table for your party, click Assign Table.
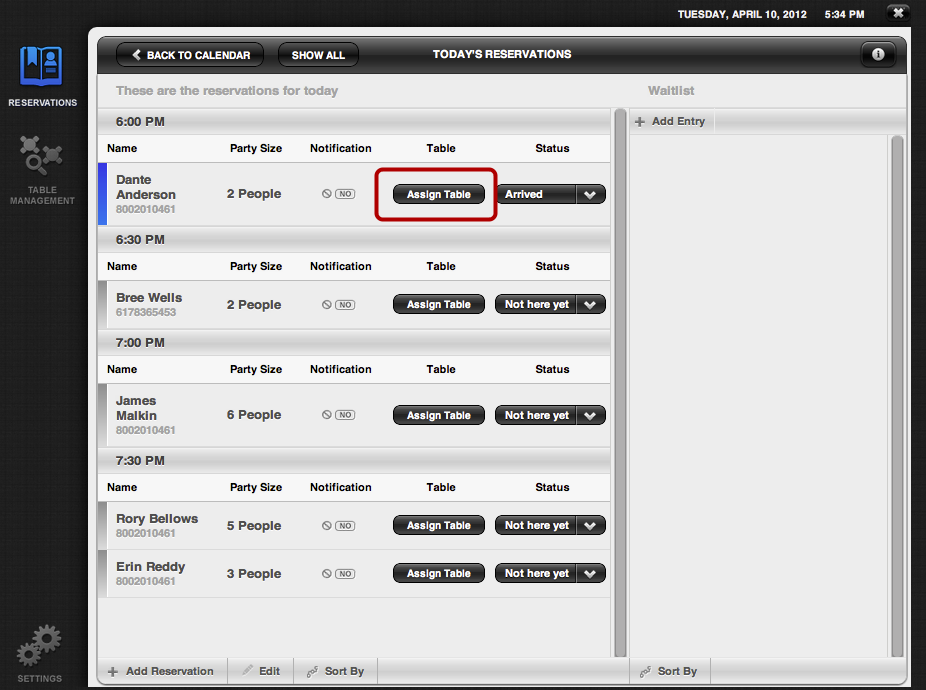
The “Assign a Table” pop-up will open, displaying all available tables:
- Click on a table that is appropriate for your party’s size.
- Click Done.
Your party’s status will be automatically updated to “Seated.”
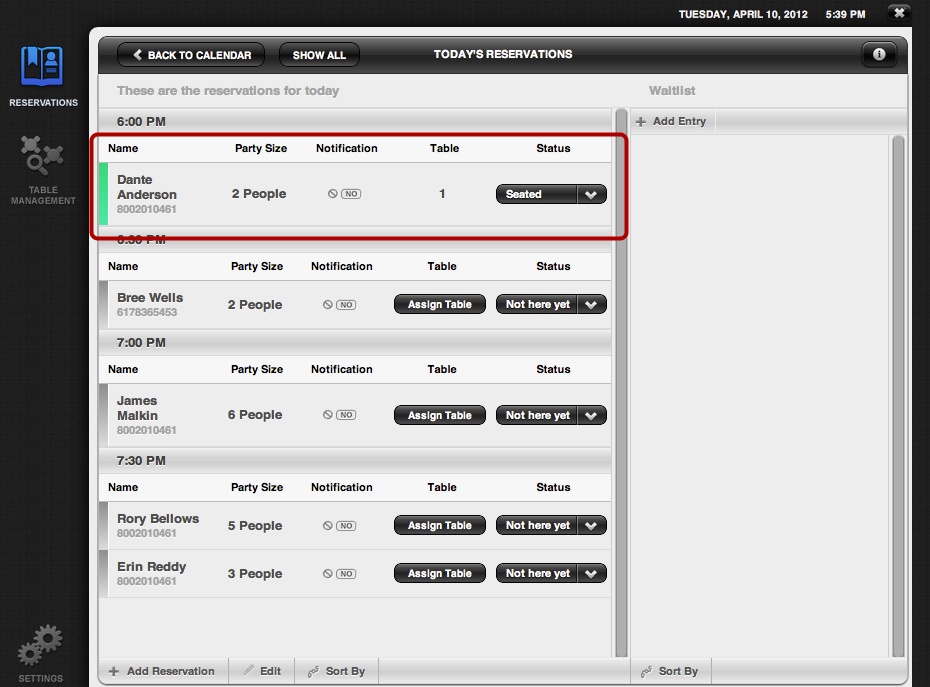
Notifying a Party When Their Table is Ready
If your party had to wait for their table to be ready and chose a notification option and their table is now ready, you can send their notification via the option they selected. Review below how to send a notification to your party.
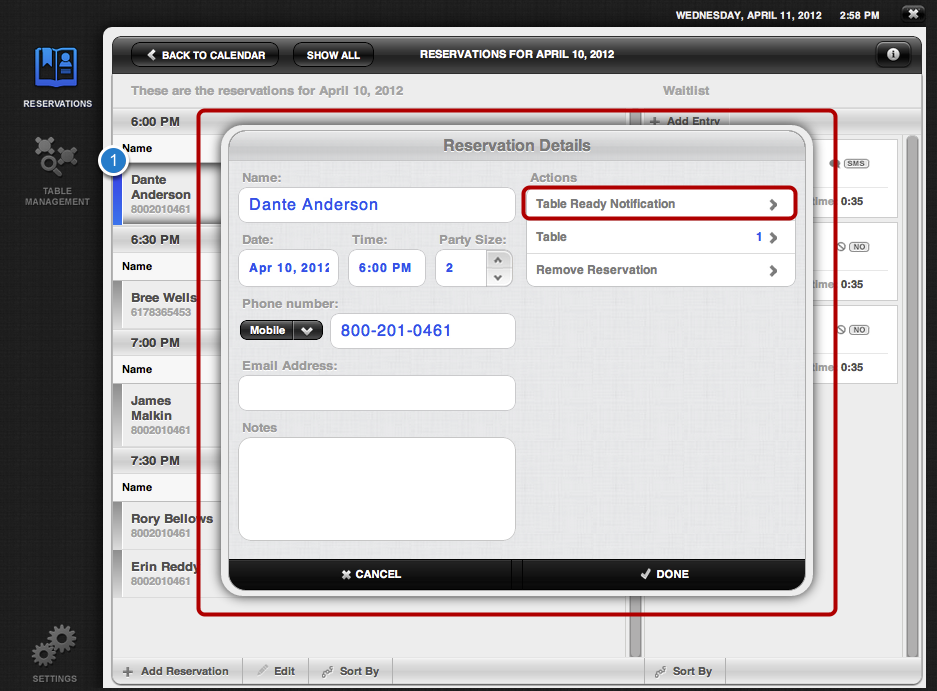
To send your party a notification:
- Double-click on the party.
- In the “Reservation Details” pop-up, click on the Table Ready Notification button.
- Click on the notification option your table had chosen earlier.
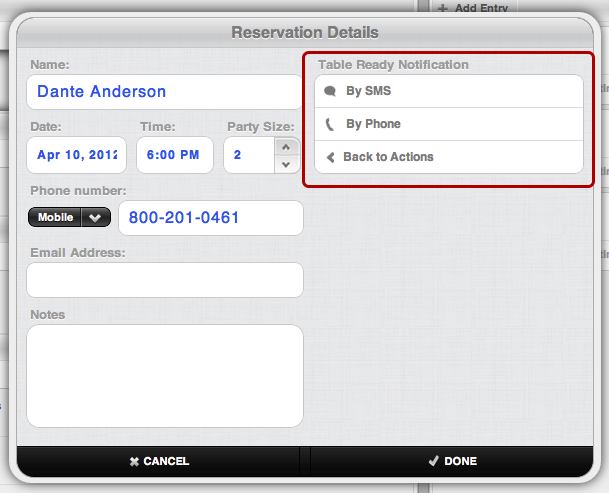
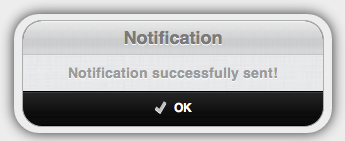
A “Notification successfully sent!” pop-up will open, confirming that your party has received their table-ready notification.
Adding Reservations
If you continue to take phone reservations, you can add manually add reservations. Review below how you can manually add reservations.
Manually Adding A Reservation
How to manually add a reservation:
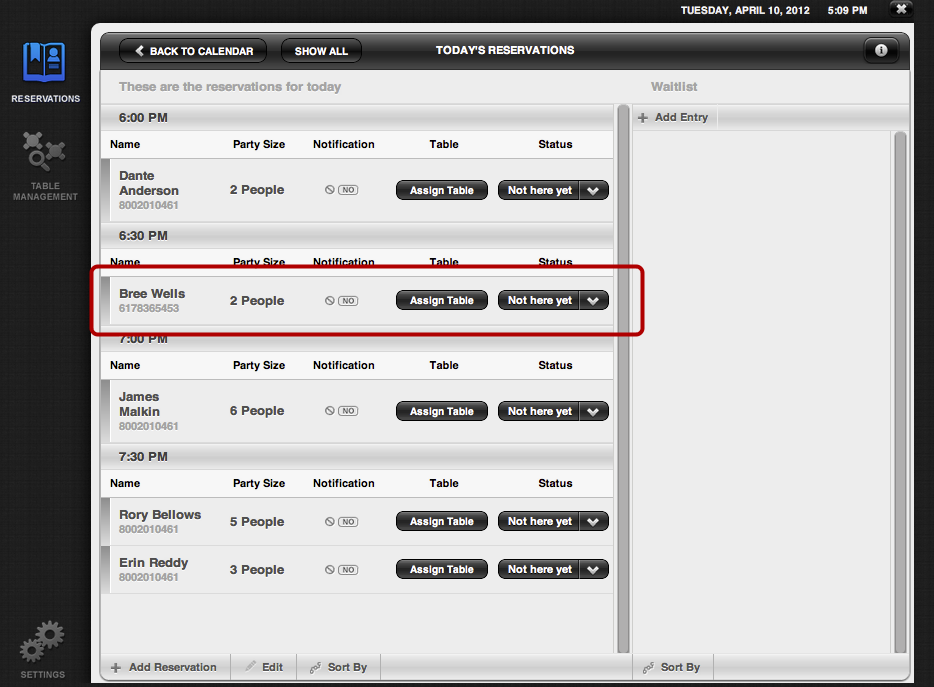
- Click on Add Reservation.
- A pop-up box will open. After you enter all of your party’s information, click Done.
- If your party wants to be notified when their table is ready, you must take a phone number as well.
Required Fields include:
- Name
- Date
- Time
- Party Size
Your reservation will be added to the list of Today’s Reservations which you will be able to see in the list.
Sorting Reservations
You can sort your reservations by party size, name, or time. Review below how you can sort your reservations.
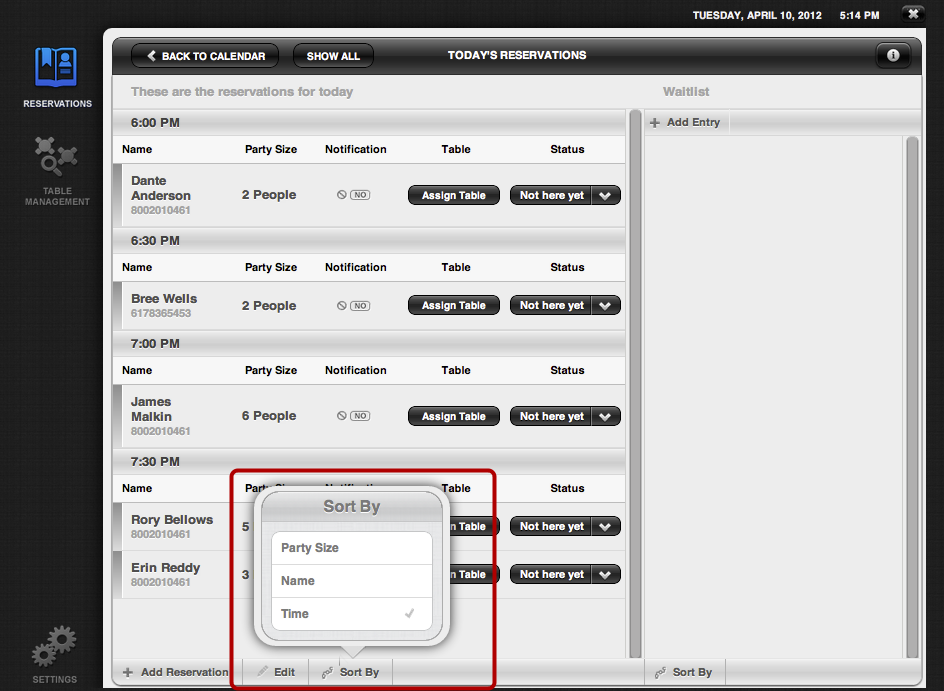
To change how your reservations are sorted, click on Sort By and then click on your preferred option.
- Your reservations will automatically sort by your desired order.
Table Management
The Table Management section allows you to view and edit your table statuses quickly and easily. Review below how to view and edit your tables in Table Management.
Viewing Table Statuses in Table Management
In the Table Management section, you can see the availability of each one of your tables at a glance.
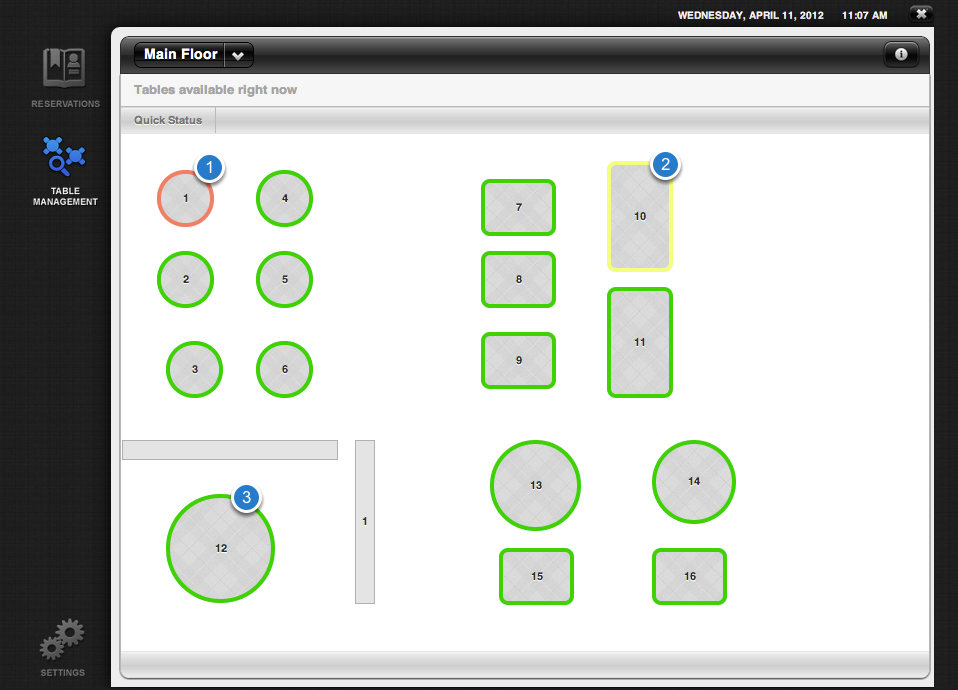
Your table statuses automatically update as you change party table statuses in the Reservations section.
- A red table represents an occupied table (1).
- A yellow table represents a table that is being bussed (2).
- A green table represents an available table (3).
Editing Table Statuses in Table Management
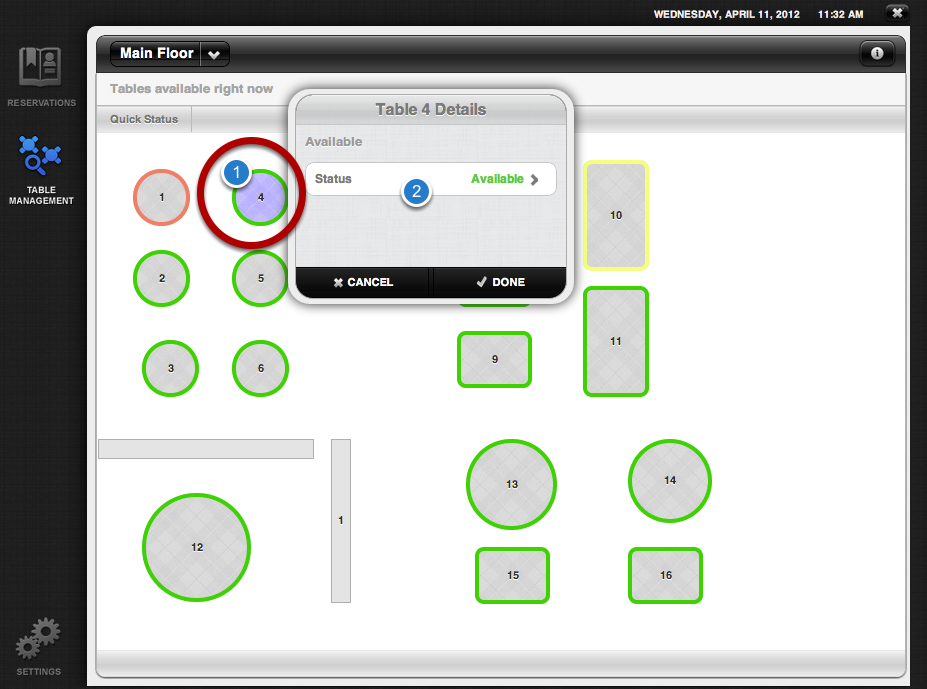
To manually change the status of a table, click on the table (1) and click on Status in the Table Details pop-up (2).
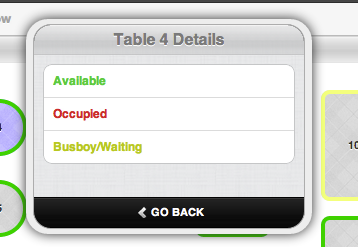
Click on the appropriate status to change the status of the table.
This will return you to the previous pop-up.
- Click Done.
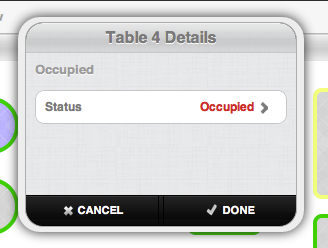
Your table status has changed and can be seen immediately.
Viewing Another Room in Table Management
To view another room in Table Management, click on the room drop-down in the upper left corner.
- Click on the room you want to view.
Quick Status in Table Management
The Quick Status section allows you to view how many tables you have available based on size. Quick Status tells you how many of each table size are occupied and how many are available. Review below how to access and view your tables in Quick Status.
To access the Quick Status view in Table Management, click on the Quick Status tab in the upper left corner of Table Management.
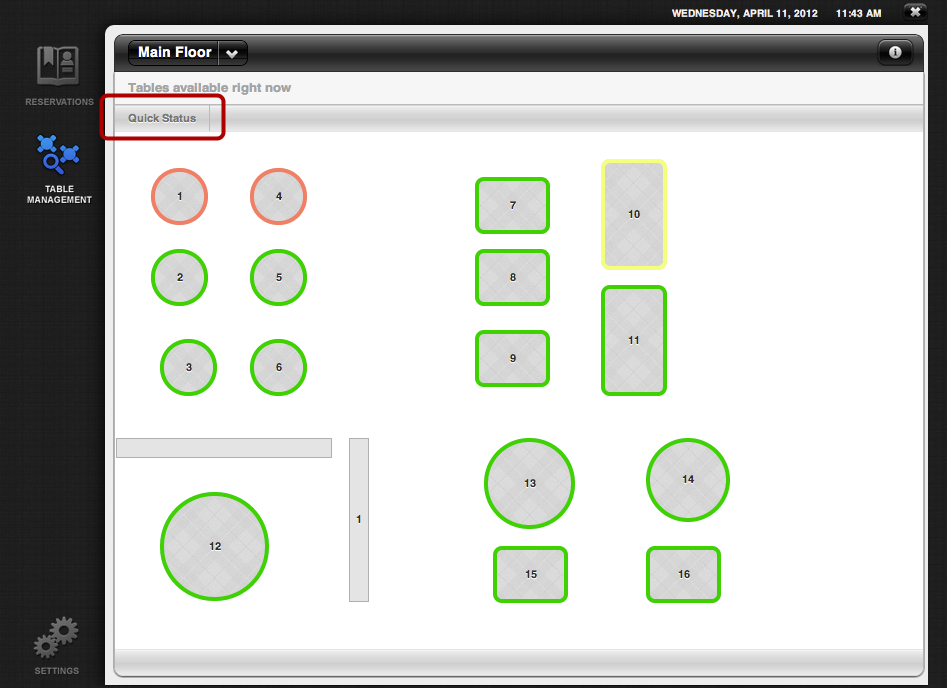
Viewing Table Availability in Quick Status
Quick Status will show you how many tables for each table size are occupied (1) and available (2). You can not edit anything in Quick Status.
To return to the Table Management main section, click on “Back to Table Management” (3).
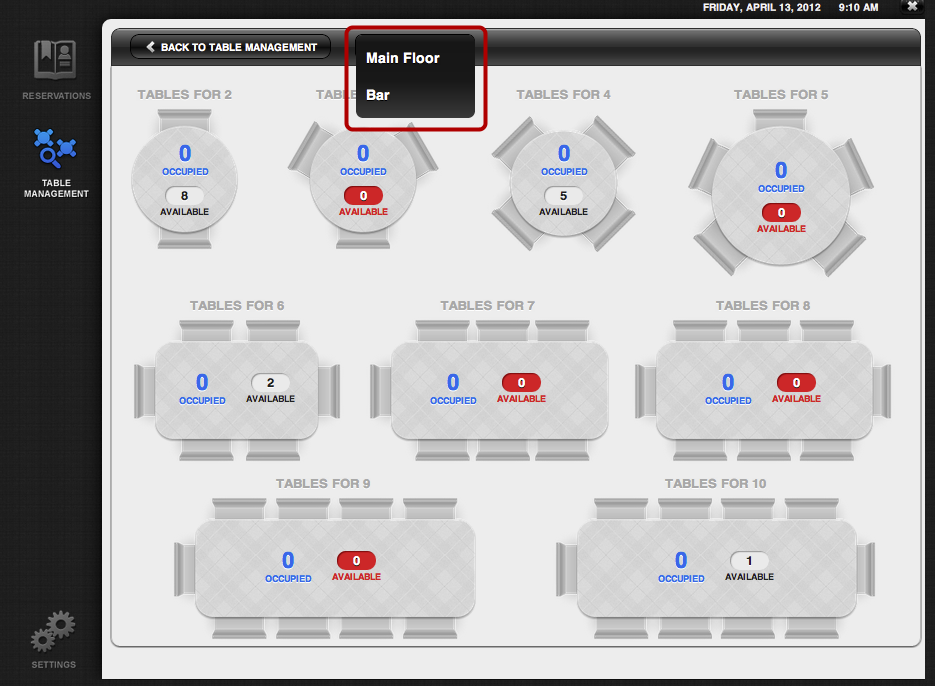
Viewing Another Room in Quick Status
To view another room in Quick Status, click on the room drop-down and select the room you want to view.
Returning to your Setup Wizard
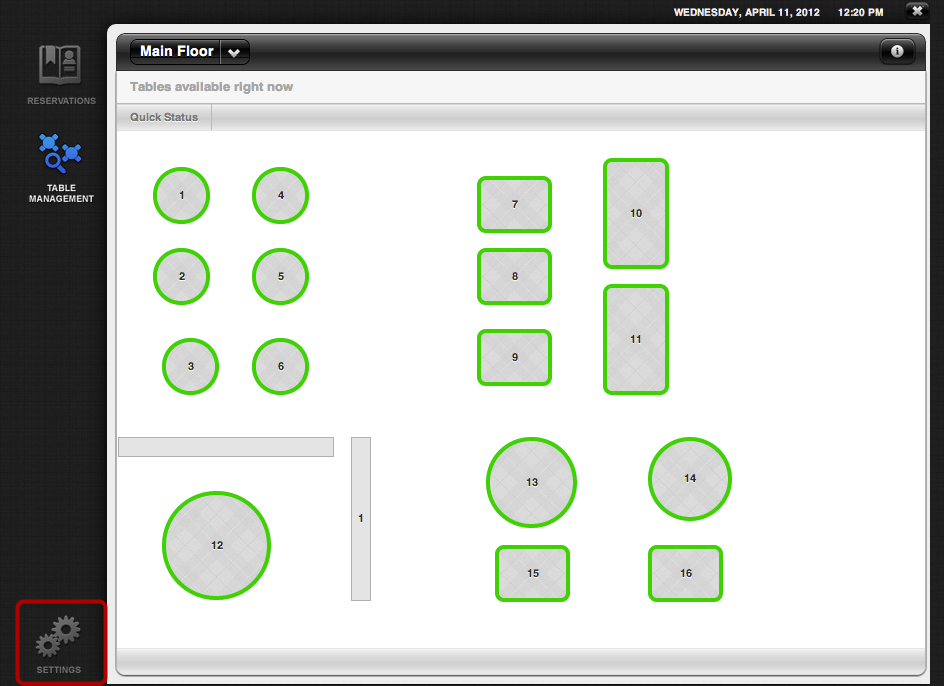
Sometimes, you may need to return to and edit your Reservations setup. Review below how to return to your setup wizard.
To return to your setup wizard, click on Settings in the bottom left corner. The Settings button will always be available in this location, regardless of what screen you are on.
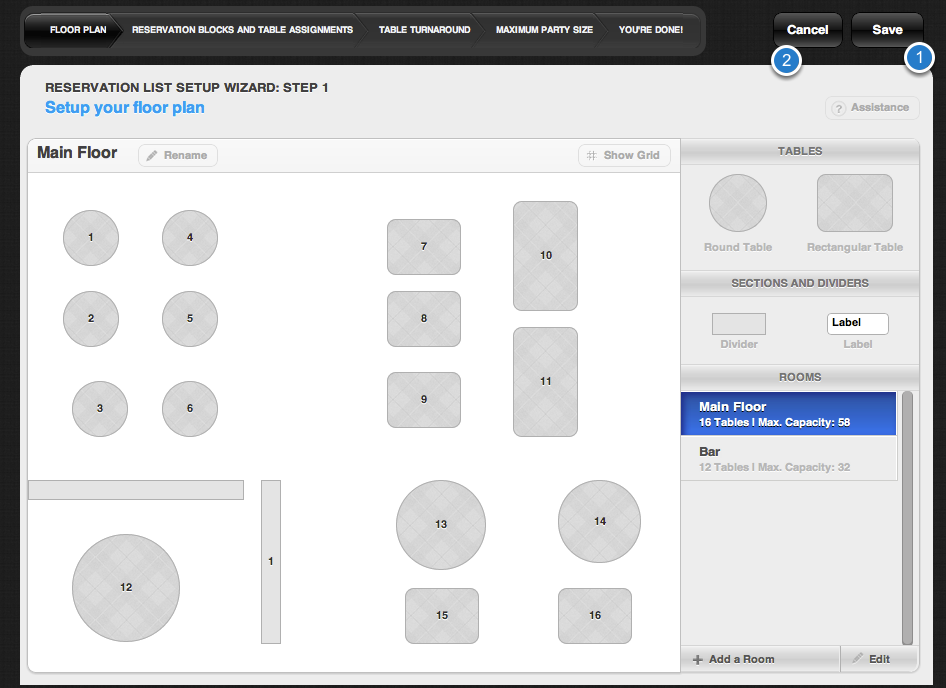
Returning to Reservations from the Setup Wizard
After you have completed your changes in the setup wizard, click on Save (1) to return to Reservations.
You may also select Cancel (2) at any time to return to your reservations without saving your work.
Show All Feature
The Show All feature allows you to view your reservations two ways: show all reservations (including canceled and closed statuses) and show active reservations (not yet here, seated and arrived statuses only). Review below how to view your reservations in both options.
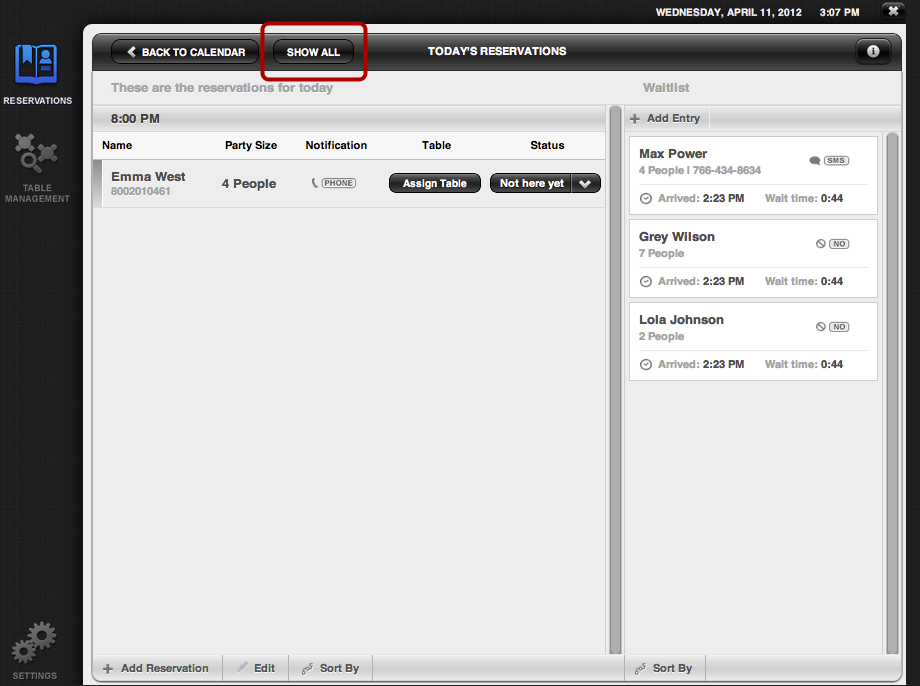
To pick which way you want to view your reservations, click on the Show All/Show Active button.
Clicking on the button will change the view to the opposite of the current view. To return to the previous view, click on the button again.
Comments
0 comments
Please sign in to leave a comment.